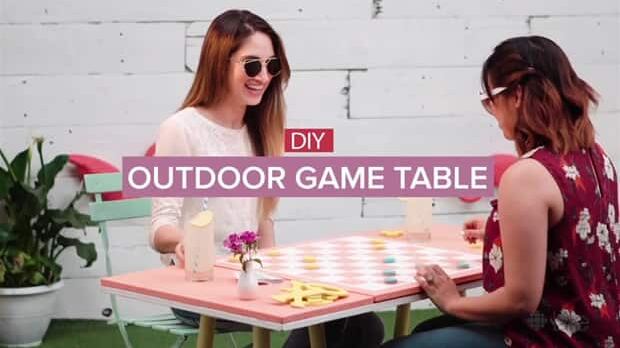
DIY pastel outdoor game table

Take a break from floating on that pool raft, and let your inner child out with this functional and positively adorable outdoor game table. With a removable checkerboard, built-in chalkboards for keeping score, and some refreshing spring colours to boot, you'll never want to retreat back inside! It's a perfect weekend project that you can enjoy all summer long.
Here's what you'll need:

- 2 stools
- Spray paint – white primer
- Pastel yellow paint
- Pastel salmon paint
- White paint
- Plywood – 122cm x 61cm
- Plywood – 61cm x 61cm
- 2 pieces of plywood – 61cm x 30.5cm
- Chalkboard paint (15mL unsanded grout + 28.5mL paint)
- Sanding block
- Craft knife
- Painter's tape
- Drill
- 5 cm screws
- Bumpers
- Pencil
- Measuring tape
- Silicon bumpers
Here's how to do it:


1. Spray down your stools with the white primer. Then paint them down in yellow.


2. Paint the 122cm x 61cm plywood white.


3. Paint the 3 remaining pieces of plywood in salmon paint. Mix 28.5 mL of the paint with the unsanded grout – this will be our chalkboard paint! Paint the two 61cm x 30.5cm pieces of plywood with the chalkboard paint.


4. When the paint is dry, sand the two 61cm x 30.5cm pieces of wood down with your sanding block. Then, using your chalk, add a layer of chalk over the dried chalkboard paint, and wipe it off. This will make sure that any writing you do on the table doesn't stay permanent.


5. Flip the 61cm x 61cm plywood over, and paint the back white.


6. Once it's dry, it's time to make our table top! Pencil marks 3.75cm in from the left border at the top, middle, and bottom. Repeat with the bottom of the board, as well as the right side, and top. Now, we're going to do the same thing, only we're going to do it 5cm in from the edge. Then, using your measuring tape, pencil in an 8x8 grid inside the 5cm border.


7. Mark every other square with your pencil – we want them to alternate, like on a checkerboard. Place painter's tape over every other row and then every other column at the 3.75cm pencil border. Use your craft knife to cut the tape away from the penciled borders we drew earlier.


8. Paint the exposed squares as well as the border of the board, and let dry. Then, peel the tape off. Now, we're going to tape again after the paint has dried– only we're going to let the tape cover the squares we just painted. Paint again, let dry, and peel the tape off. Behold your freshly made checkerboard!


9. Next, it is time to paint your tic tac board guideline on top of the checkerboard. Place painters tape to indicate a thin 3 x 3 grid on the checkerboard. Paint over it in mint green to differentiate the different game tables.


10. Back to our 122cm x 61cm plywood. Fasten the stools to the board using 5cm screws. Flip your new table upright and fasten the 61cm x 30.5cm cuts to either side of the base board using 3cm screws.


11. Attach silicon bumpers to the four corners of the remaining white space on the base board. Add your checkerboard!
12. Paint over the exposed screws in the chalkboards to make them blend in. Once dried, you're ready to play!


13. Now add your checker pieces, grab your mojitos and some chalk, and get playing!
